Cloud migration is complex. Organizations use multiple tools to migrate workloads to Azure, which help them:
- Discover and assess migrated servers and applications
- Right-size target VMs in Azure
- Track progress and monitor migration projects
Additionally, organizations want comprehensive solutions that migrate on-premises physical and virtual servers and applications, at scale, from anywhere to Azure. This is precisely what Azure Migration Services and the associated Azure Migrate platform do.
This article will take a closer look at Azure Migrate, its key capabilities, pricing, and limitations and walk you through how to migrate a virtual machine (VM) from AWS to Azure.
What are Azure Migration Services?
Azure Migrate is the platform used by Microsoft Azure Migration Services to help organizations discover, assess, size, and migrate private and public cloud workloads to Azure. Azure Migrate provides a central hub to evaluate Windows and Linux physical and virtual servers, databases, web applications, and virtual desktops and migrate them to Azure. Source environments include Hyper-V, VMWare, AWS, and GCP.
The two main tools in Azure Migrate are Azure Migrate: Discovery and Assessment and Azure Migrate: Server Migration.
The discovery and assessment tool evaluates on-premises VMs running in VMware and Hyper-V environments and physical servers for migration readiness, sizing requirements, cost, and dependencies.
The discovery and assessment tool uses lightweight appliance software that runs on-premises to gather and send the required data to Azure. In addition to server discovery, the appliance collects server configuration and performance metadata for assessments and discovers installed software, ASP.NET web apps, SQL Server instances, and databases.
The appliance discovery is agentless—nothing gets installed on the discovered servers. You can register multiple appliances to a single migration project. However, an appliance can’t report to more than one project.
The table below lists the supported Azure Migrate appliances and their characteristics.
| Appliance type | Discovery Limits | Hardware Requirements | Platform-Specific Requirements |
|---|---|---|---|
| VMware | 10,000 VMs across multiple vSphere servers | Windows Server 2016, 32 GB RAM, 8 vCPUs, around 80 GB of disk storage | vCenter Server running 5.5, 6.0, 6.5, 6.7, or 7.0 and an ESXi host running version 5.5 or later |
| Hyper-V | 5,000 VMs; can connect to 300 Hyper-V hosts | Windows Server 2016, 16 GB RAM, 8 vCPUs, around 80 GB of disk storage | Windows Server 2012 R2 or laterHyper-V VM version 5.0 |
| Physical/Public Cloud | 1000 physical servers / public cloud VMs | Windows Server 2016, 16 GB RAM, 8 vCPUs, around 80 GB of disk storage | Windows Server 2016 and meets hardware requirements |
For more information, see Azure Migrate appliance – Azure Migrate | Microsoft Docs.
The server migration tool helps organizations with the actual migration of on-premises VMware VMs, Hyper-V VMs, physical servers, and public cloud VMs (AWS, GCP).
Server migration uses a replication appliance to migrate agent-based VMware VMs, physical servers, and public cloud VMs to Azure. In addition to the appliance, these migrations require the deployment of replication servers to replicate data to Azure and migrate workloads. For server specs and software requirements, please look at the replication section below.
The table below explains the required discovery and migration appliances for Azure Migrate server migration scenarios
| Migration Scenario | Appliance | Replication Appliance/Server |
|---|---|---|
| VMware, agentless | Yes | No |
| VMWare, agent-based | Yes | Yes |
| Hyper-V | Yes | No |
| Physical Servers | Yes | Yes |
| Cloud VMs | Yes | Yes |
The table below lists Azure Migrate integrated and partner tools:
| Scenario | Integrated Tools | Partner Tools |
|---|---|---|
| Server Discovery | Azure Migrate: Discovery and Assessment | |
| Server Assessment | Azure Migrate: Discovery and Assessment Movere | Cloudamize CloudSphere Corent Technology Device42 Turbonomic UnifyCloud |
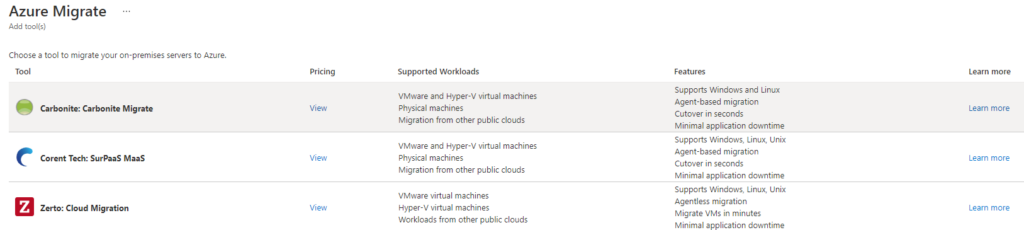
| Server Migration | Azure Migrate: Server Migration | Carbonite Corent Technology RackWare Zerto |
| SQL Server Assessment | Data Migration Assistant | UnifyCloud |
| SQL Migration | Azure Database Migration Service | |
| Web App Assessment | Web App Migration Assistant | |
| Web App Migration | Web App Migration Assistant | |
| VDI Assessment | Lakeside |
Key Capabilities
Cohesive Migration Hub
A central migration portal with end-to-end visibility to start, run, track progress, and monitor your migration to Azure.
Integrated Tools
Azure Migrate includes discovery, assessment, and migration tools from Microsoft and the partner ecosystem.
Range of Supported Workloads
Discover, assess, and migrate servers, databases, web apps, virtual desktops, and data from an on-premises or public cloud to Azure.
Pricing
Server Migration
Server migration is free with Azure Migrate for the first 180 days. However, storage and data transfer charges will apply during that period. After 180 days, Azure Migrate costs $25/month per replicated server.
Database
Database Migration Service (DMS) is free for the first 180 days. After 180 days, two pricing tiers apply: standard and premium. The standard tier stays free for all customers. This tier supports offline migration and offers 1-, 2-, and 4-vCore options. The premium pricing tier supports offline and online migration and provides 4 vCores at $0.404/hour.
Web Apps
Web app assessment and migrations are free.
Partner Tools
The integrated partner tools are priced based on vendor licensing agreements. Customers who want to use the tools can contact the vendors or use Azure Marketplace to buy the required licenses.
Configuring Azure Migration Services
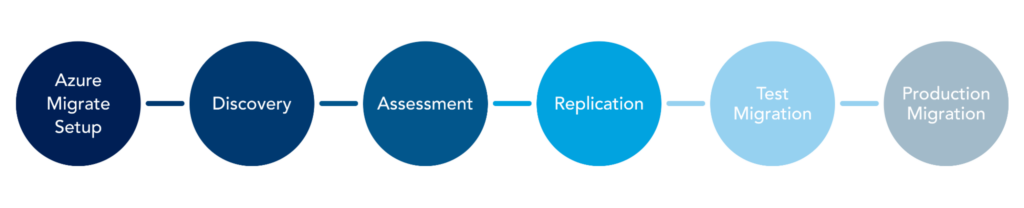
Server and application migration from virtualized environments (e.g., VMware & Hyper-V), physical hardware, and public clouds (e.g., AWS & GCP) requires certain key steps, including project setup, discovery, assessment, replication, test migration, and production migration. This section will describe an example of migrating a Windows Server 2019 from AWS to Azure. Azure Migrate treats public cloud migrations as physical servers and hence requires appliance and replication servers to be installed and configured in source environments.
Azure Migrate Setup
- Sign into the Azure portal, select All Services, and search for Azure Migrate.
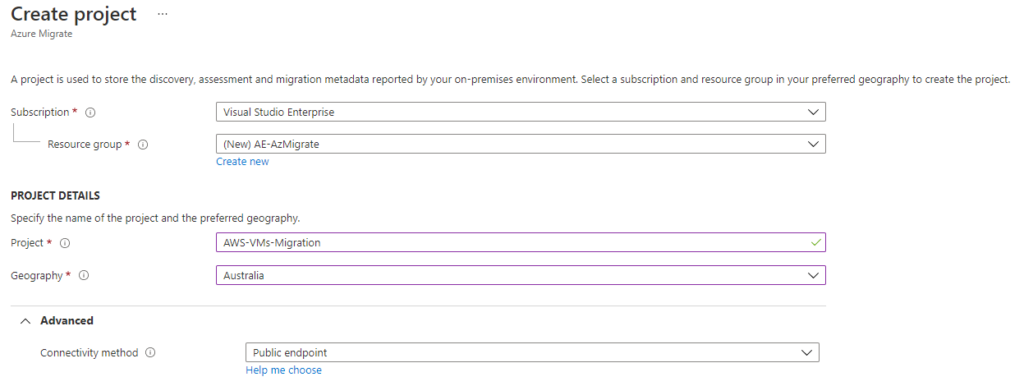
- Click Create a migration project, then:
- Choose your subscription.
- Use an existing resource group or create a new one.
- Specify the name of the project and preferred geography.
- Click Create.
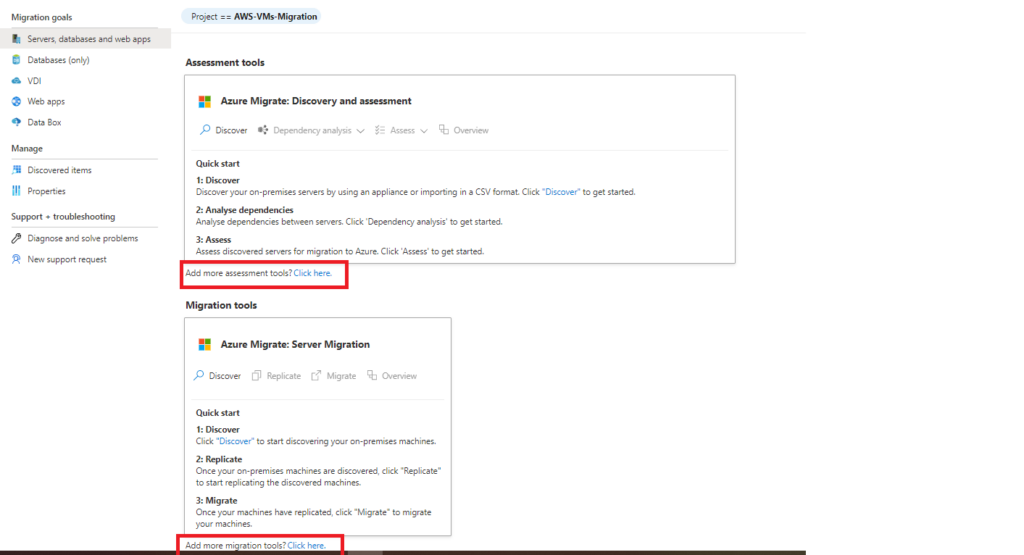
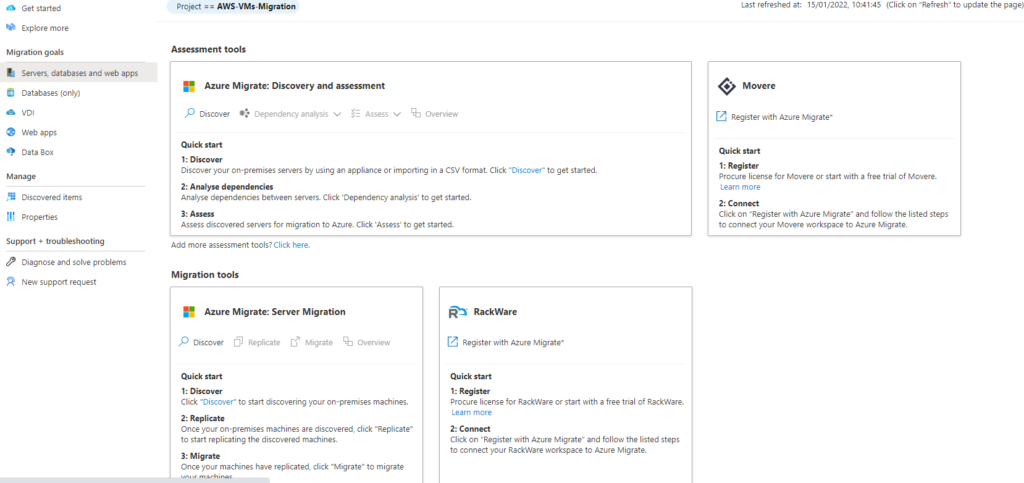
Azure Migrate projects start with the native Microsoft assessment and migration tools: Azure Migrate: Discovery and Assessment and Azure Migrate: Server Migration. To add more assessment tools to your project, click on Click here under the assessment tools section. To add more migration tools to your project, click on Click here under the migration tools section.
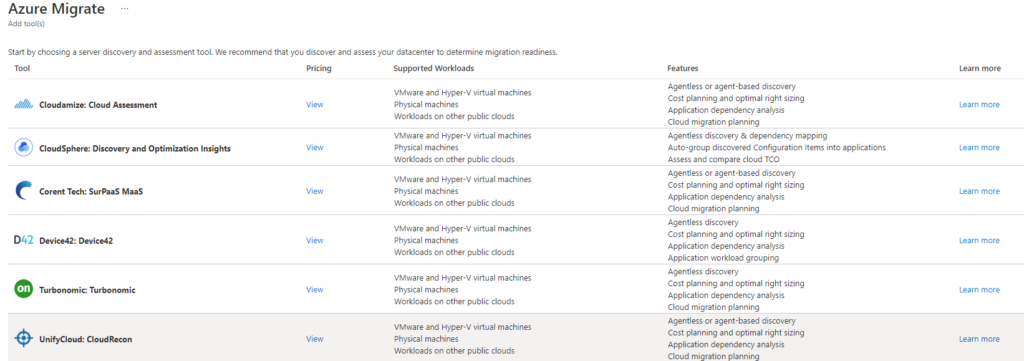
Azure Migrate supports the assessment tools shown below:
Added assessment and migration tools appear on the left side of the assessment and migration sections. For demo purposes, we have added Movere and RackWare to this project. These tools can be used for server assessment and server migration, respectively. Registration and connection are required before using these tools.
Discovery
Azure Migrate supports the Discover using appliance and Import using CSV server discovery methods.

While the appliance provides accurate discovery and assessment, some environments may choose the CSV option for various reasons. For example, organizations that want a quick, initial assessment before deploying the appliance may use the import using CSV option. Also, security constraints preventing organizations from gathering and sending data collected by the appliance to Azure can be another reason for using the CSV option.
One CSV file can include up to 20,000 servers. The file consists of 24 fields, of which only four are required: server names, the number of cores, memory configuration, and the running operating systems. For more information, take a look at https://docs.microsoft.com/en-us/azure/migrate/tutorial-discover-import.
This guide will use the Discover using appliance option to demonstrate detailed discovery and assessment data.
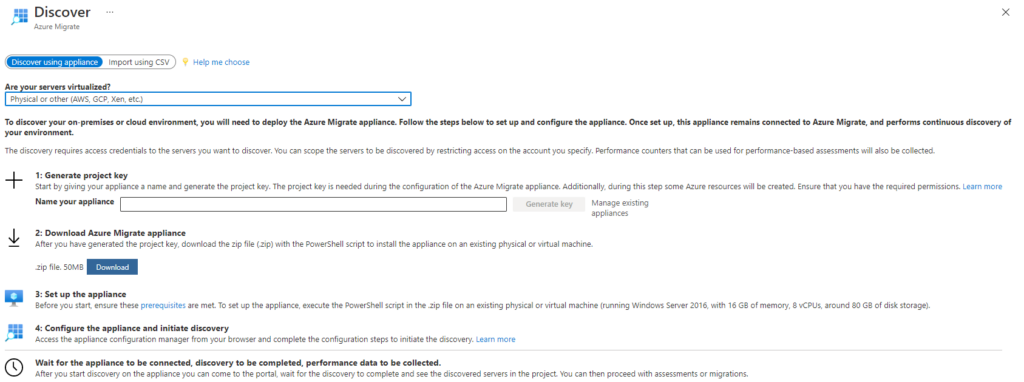
- To use the appliance for server discovery, follow the steps below:Install Windows Server 2016 in AWS using instance type: t2.2xlarge, number of vCPUs: 8, and Volume size (GiB): 80.
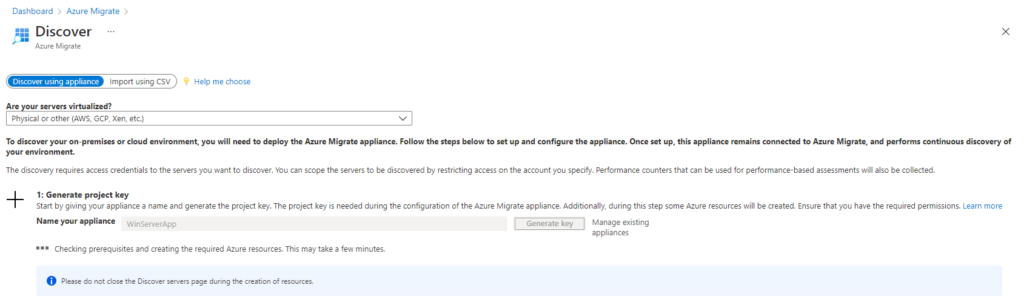
- Name your appliance and click Generate project key in Azure Migrate.

- Download the Azure Migrate appliance installation files by clicking Download. This download is a 50 MB zip file with the required PowerShell script to install the appliance software on the server.
- Before copying the downloaded file to the appliance server, verify security, the latest appliance version, and the hash value by running the Certutil utility on the file.

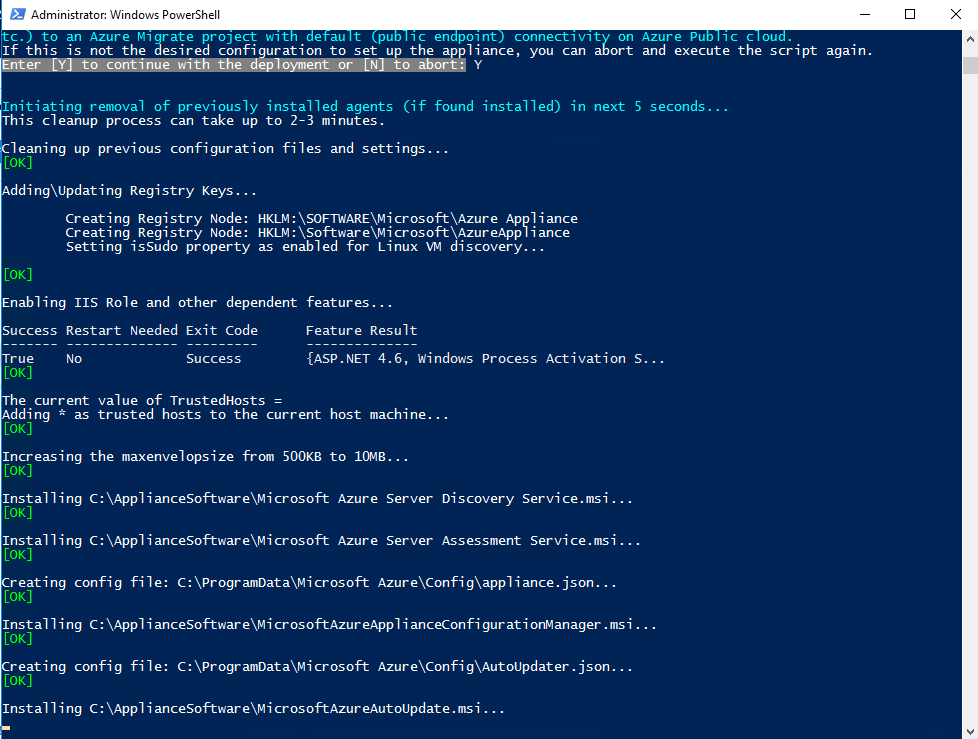
- Run the installer script on the appliance server:
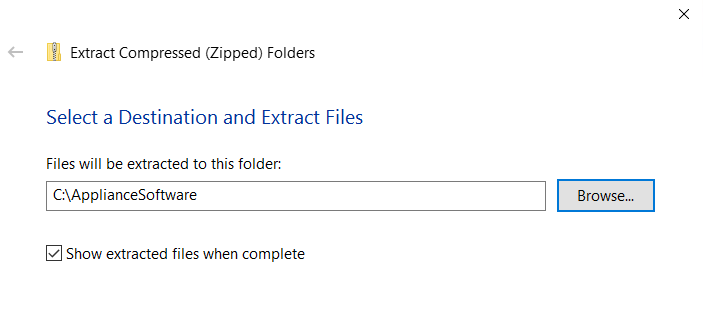
- Extract to a folder:
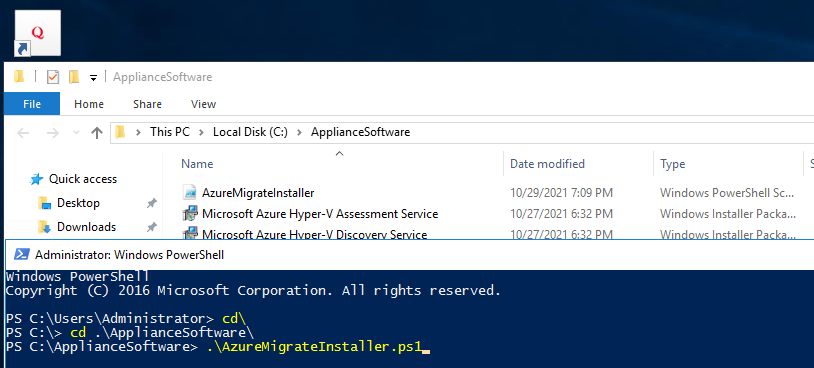
- Launch PowerShell with Admin privileges, change the directory to the folder of the extracted files, and run AzureMigrateInstaller.ps1:
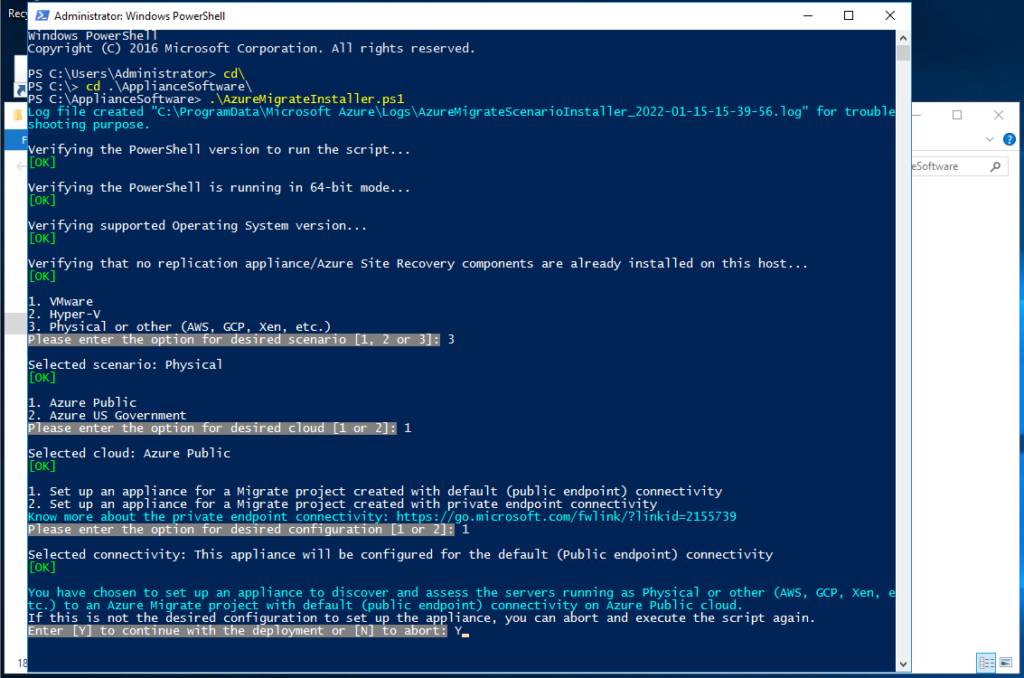
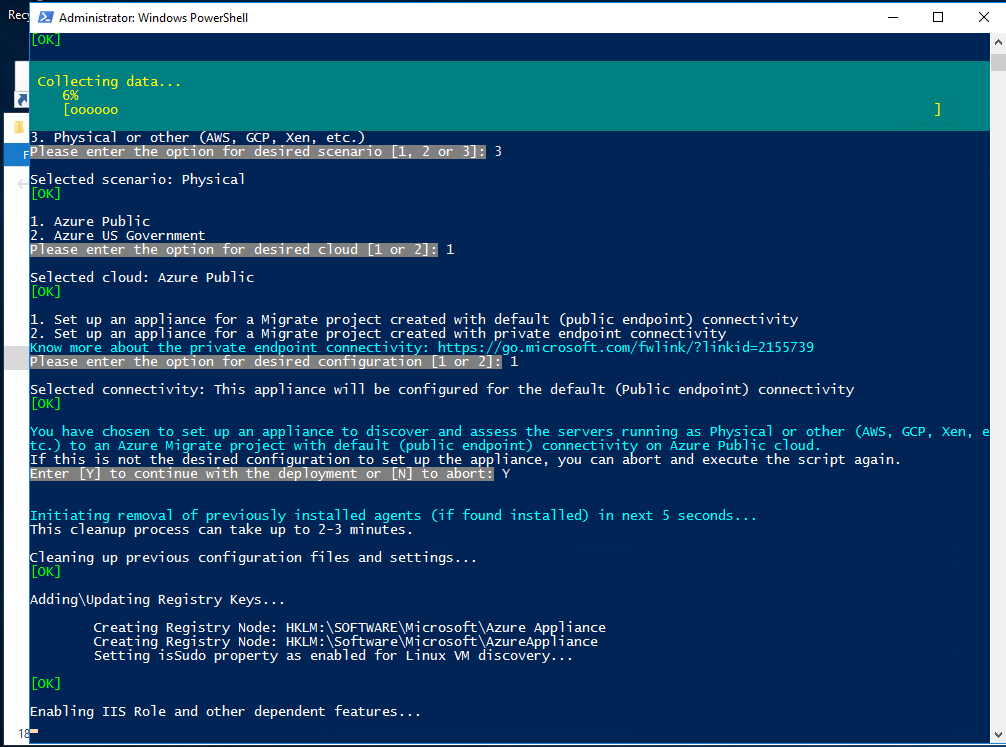
Answer the validation questions. The installation script goes through a few questions to validate the source environment and cloud connectivity before deploying the appliance with the desired configuration.
- Launch the appliance configuration manager once the installation and configuration are complete (https://server name or IP address:44368). Alternatively, use the shortcut on the desktop.
- The appliance checks the prerequisites first before it can initiate server discovery. The appliance ensures that connectivity to Azure public URLs is established, time sync with Azure is current, and the server is running the latest software.
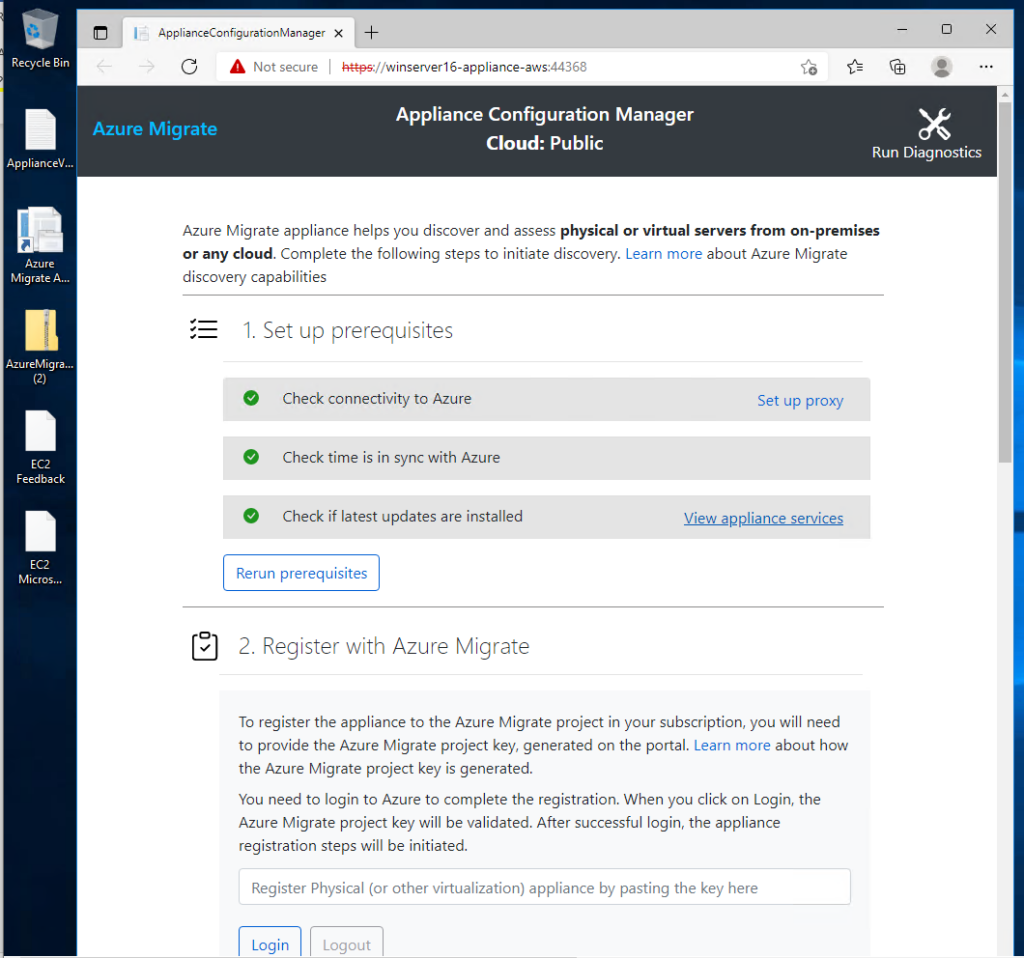
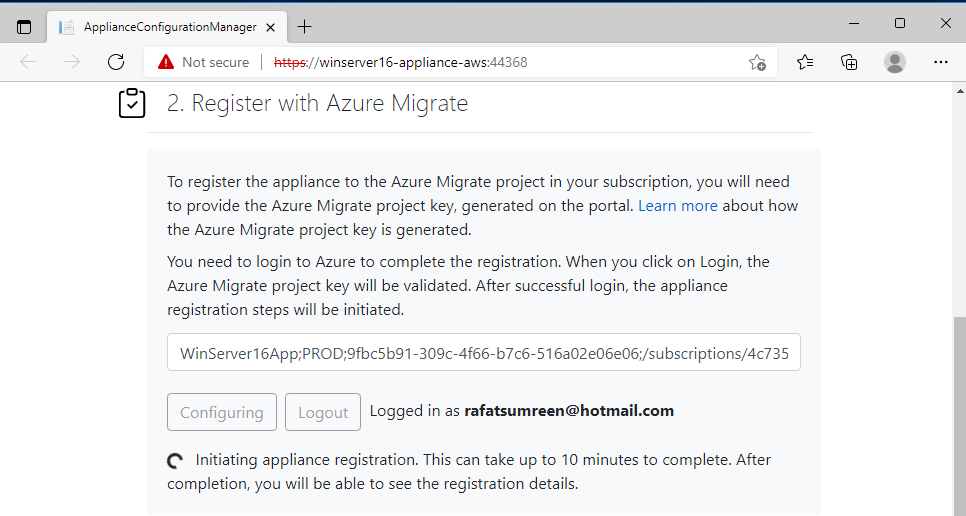
- Register with Azure Migrate. The Azure Migrate registration requires the project key generated in step two above.
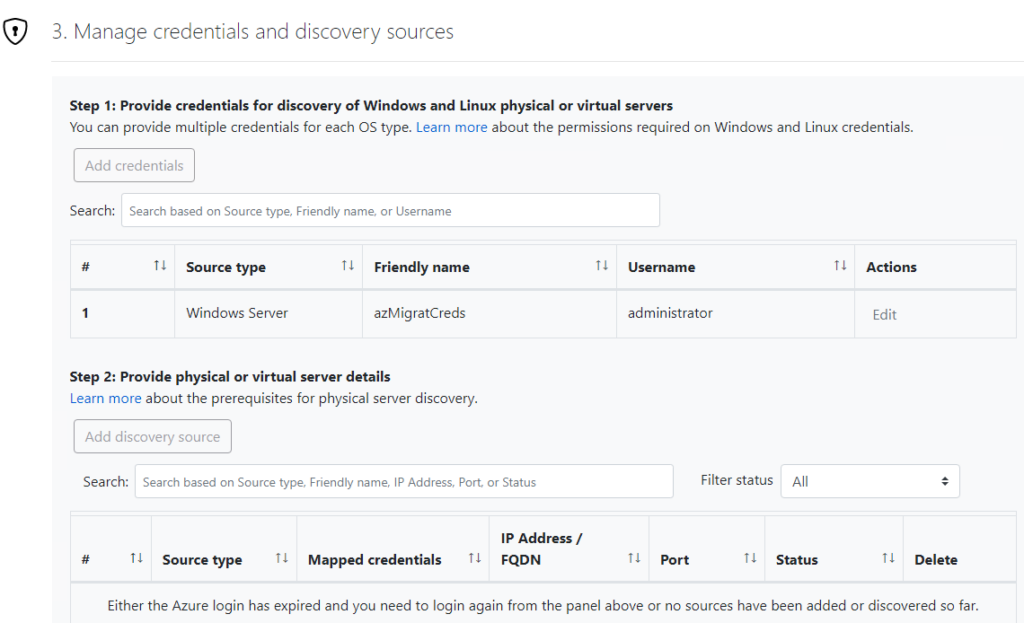
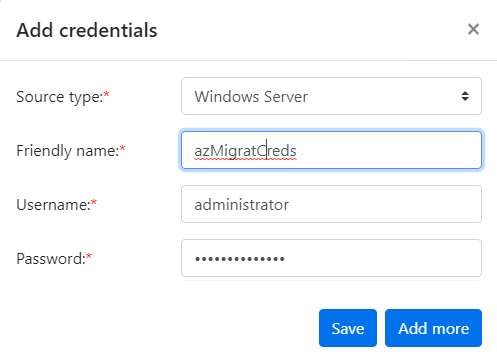
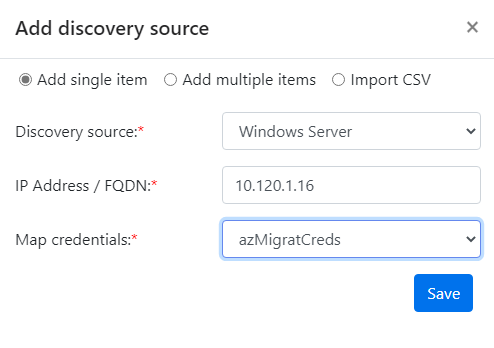
- The final step is to manage credentials and discovery sources. This step requires adding credentials to discover servers in the environment and adding servers to be discovered. The add discovery source can be a single server, multiple, or a CSV import.
- The appliance is now ready for discovery. Click on Start discovery.
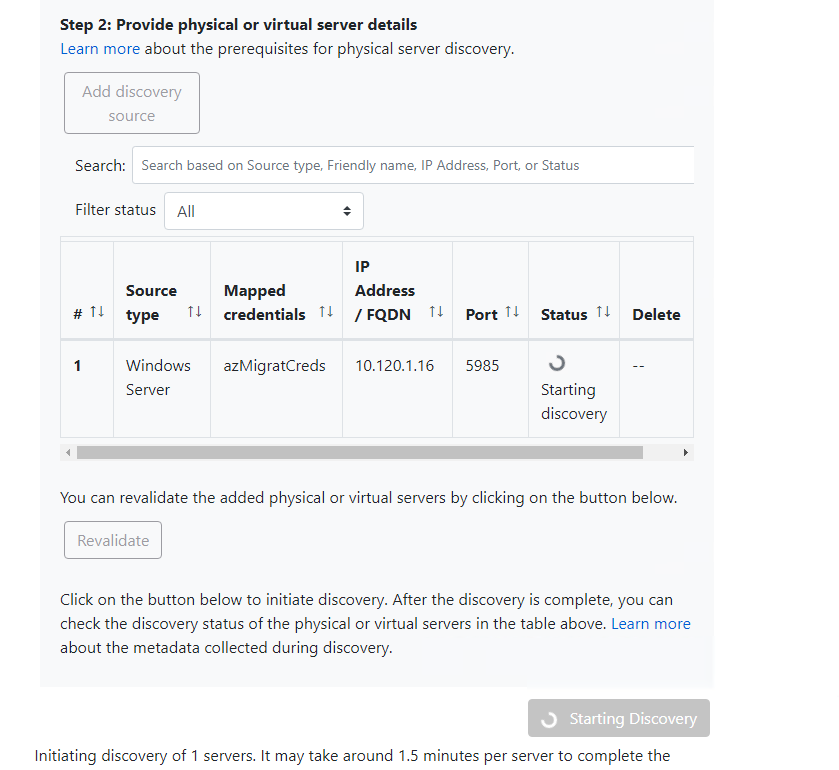
The discovery process starts. The appliance collects server configuration and performance metadata for assessments. It may take up to 15 minutes per server to complete the discovery process.
Once it has completed successfully, the appliance reports back with the “Discovery has been successfully initiated” message.

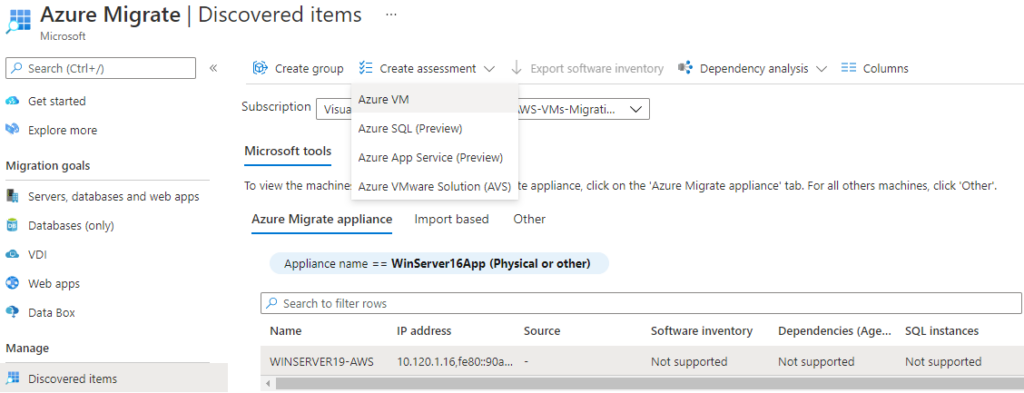
- Back to the Azure portal and Azure Migrate, click on Discovered items under Manage to see the list of discovered servers. Winserver19-AWS is listed with detailed configuration in the screenshot below, including cores, memory, storage, and operating system.

Assessment
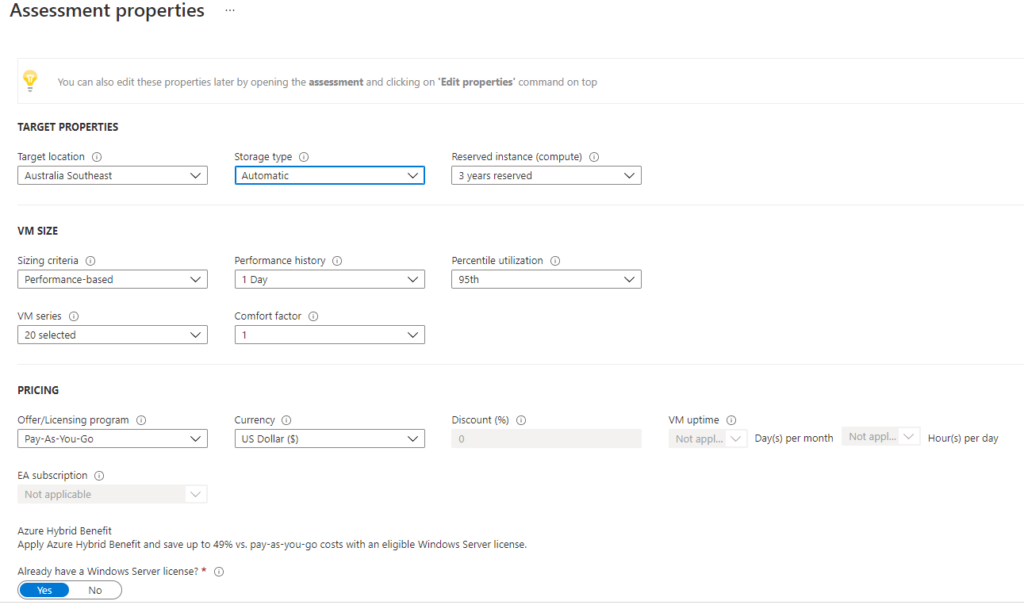
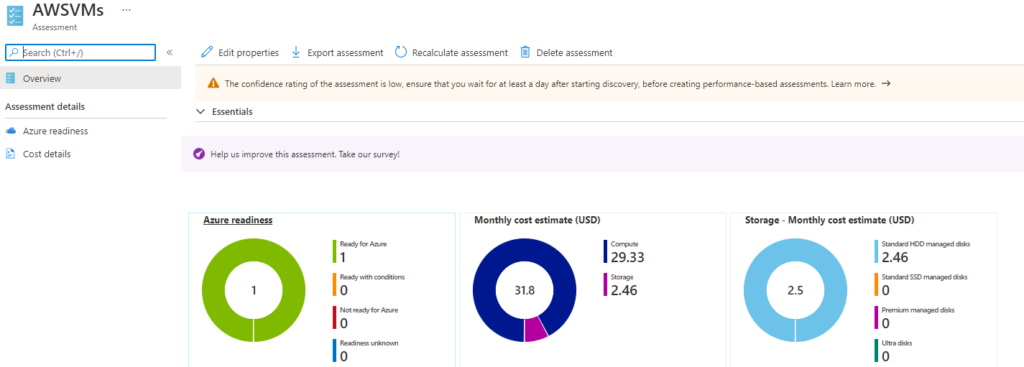
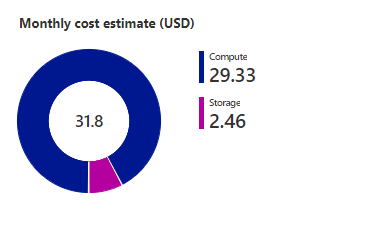
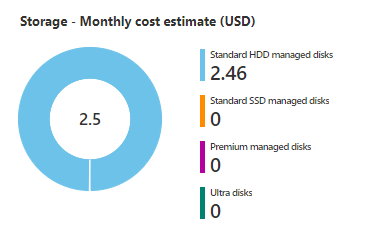
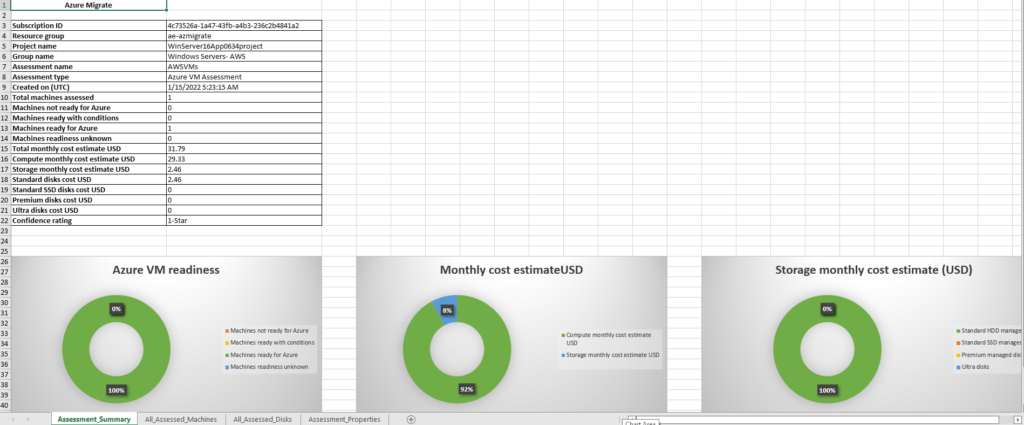
Assessments provide measurement and cost estimates for migrating servers to Azure. Assessments are a point-in-time snapshot of data that is performance-based. The figure below shows Azure Migrate assessment properties. These properties can be edited to suit specific migration projects if needed.
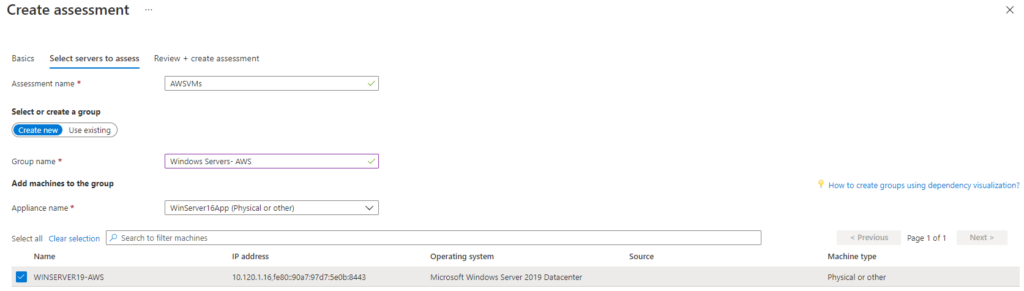
To create an assessment, follow the below steps:
- Click on Create assessment under Manage, Discovered items
- Select Azure VM, Discovery source: Azure Migrate appliance
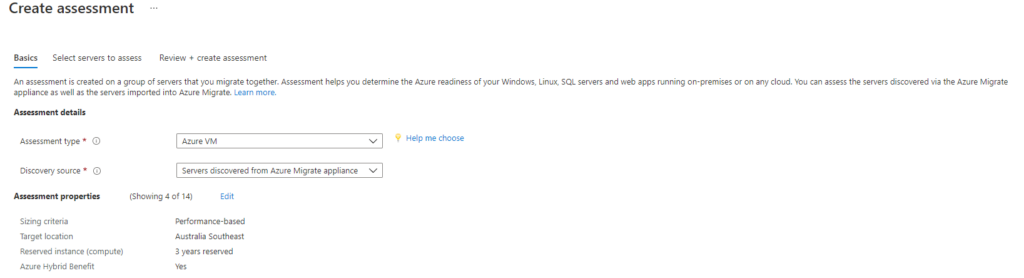
- Specify assessment name, group name, appliance name
- Select the servers for the assessment
- Click Create assessment.
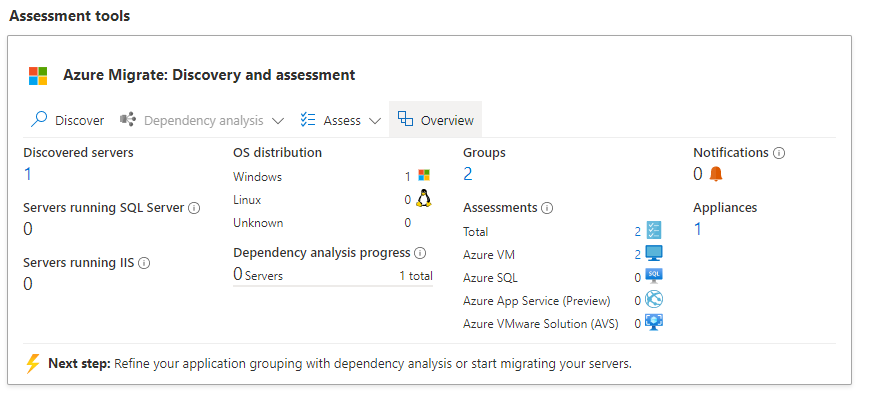
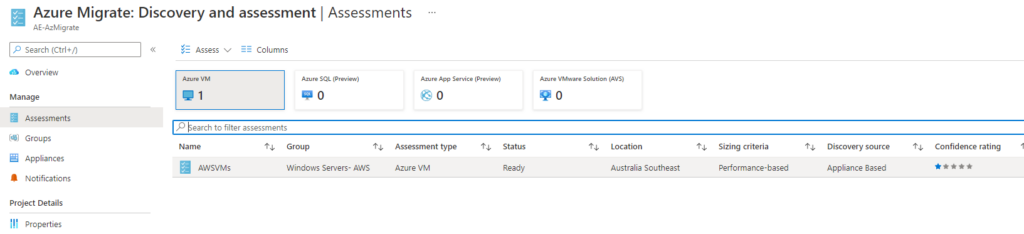
The process will take a few minutes to complete. To review the assessment data, go back to Assessment tools, Azure Migrate: Discovery and assessment, and click on Overview.
- Go to Assessments, click on the required assessment, drill down to Azure readiness, Monthly cost estimate, and Storage- Monthly cost estimate.

The Export assessment option provides an Excel report view of the assessment. The report includes four worksheets: Assessment_Summary, All_Assessed_Machines, All_Assessed_Disks, and Assessment_Properies.

Replication
Azure Migrate: Server Migration uses a replication appliance to replicate data to Azure in on-premises physical and public cloud migrations. This is not the case with VMware and Hyper-V environments, where the Azure Migrate appliance is used for data replication.
The replication appliance coordinates communications between the source environment (on-premises, AWS, GCP) and Azure, receives replication data from discovered servers, applies caching, compression, and encryption, and sends the data to Azure.
The replication appliance requires the following hardware, software, and networking settings:
| Hardware | Specs | Settings |
|---|---|---|
| CPU cores | 8 | |
| RAM | 16 GB | |
| Number of disks | 3; OS, cache, and retention drives | |
| Free disk space (cache) | 600 GB | |
| Free disk space (retention disk) | 600 GB | |
| Software | Operating System | Windows Server 2016 |
| TLS | 1.2 | |
| MySQL | MySQL should be installed on the appliance | |
| .NET Framework | 4.6 or later | |
| Ports | Control channel orchestration | 443 |
| Data transport | 9443 |
To set up the replication server appliance, follow the steps below:
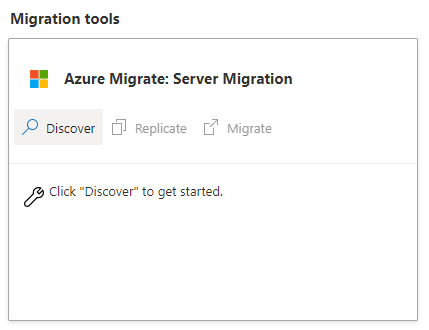
1. Click on Discover under Azure Migrate: Server Migration
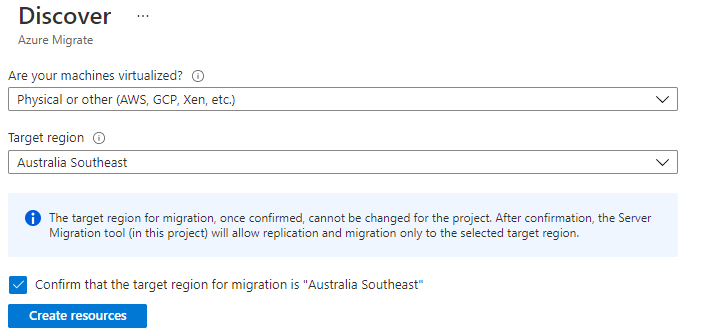
2. Select the environment and region, and tick the Confirm checkbox; click Create resources if the target region is correct. This step creates an Azure Site Recovery vault in the background.
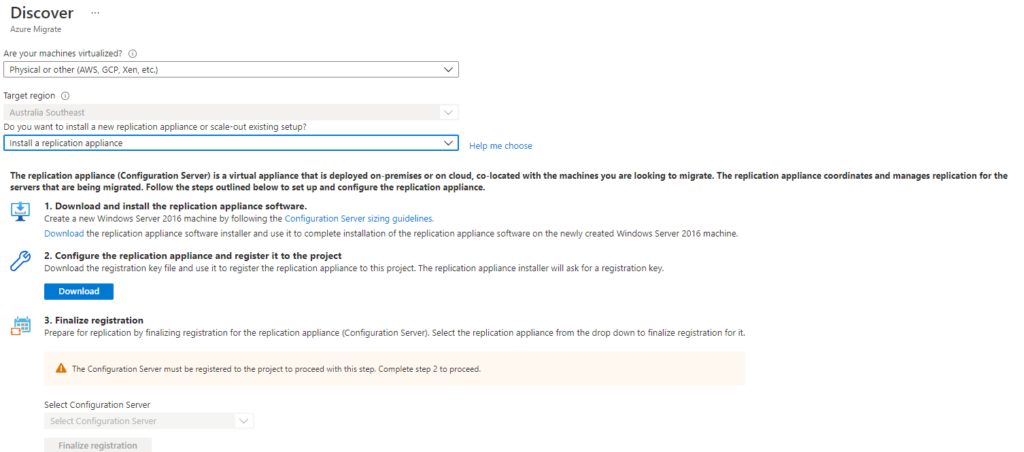
3. Select Install a replication appliance, and click on Download in steps 1 and 2.
a. Step 1 downloads the replication appliance software installer.
b. Step 2 downloads the registration key file to register the replication appliance to this project.
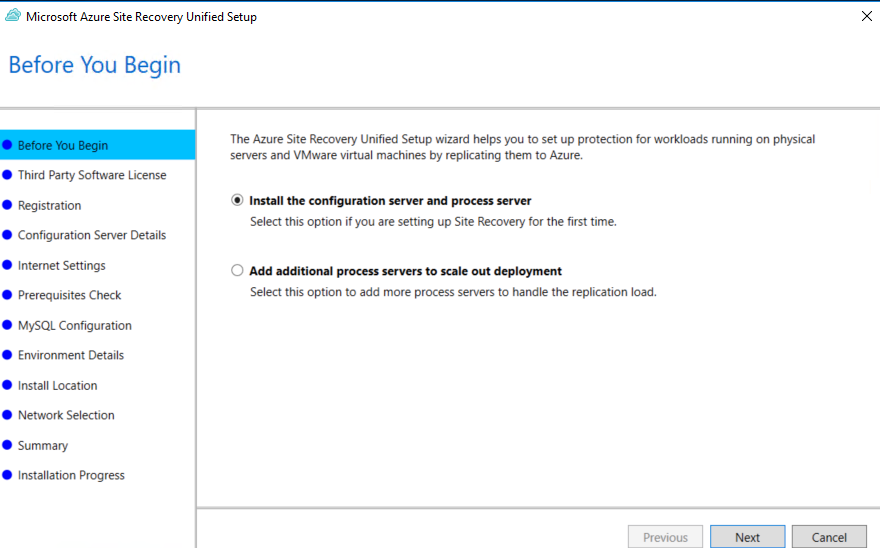
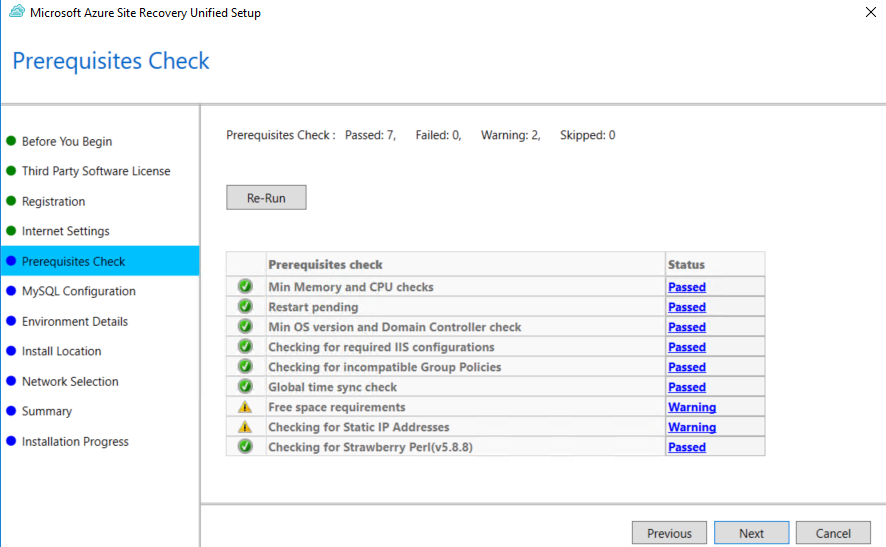
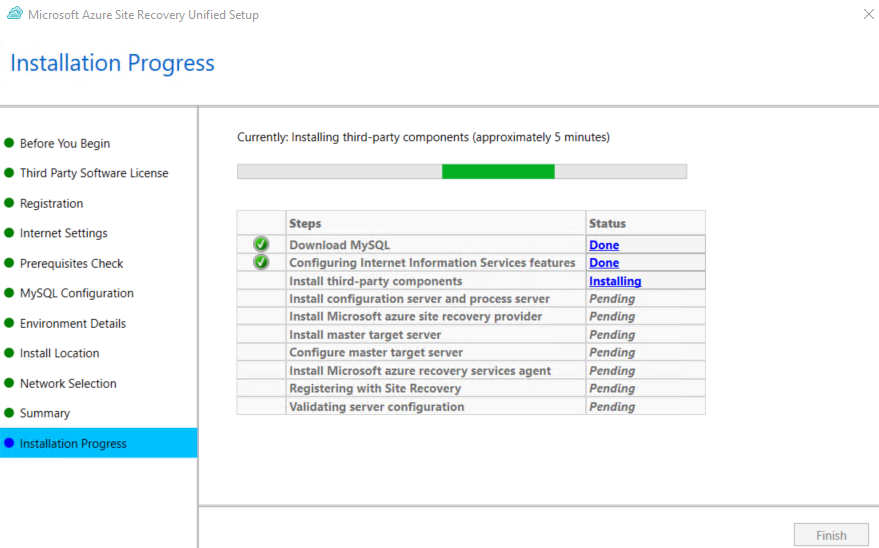
4. Run the replication appliance software installer to install Azure Site recovery Unified setup. The installation checks storage and Internet connectivity, installs IIS and MySQL, installs and configures the master target server, and sets port 9443 for data transport.
The installation and configuration process takes around 45 minutes.

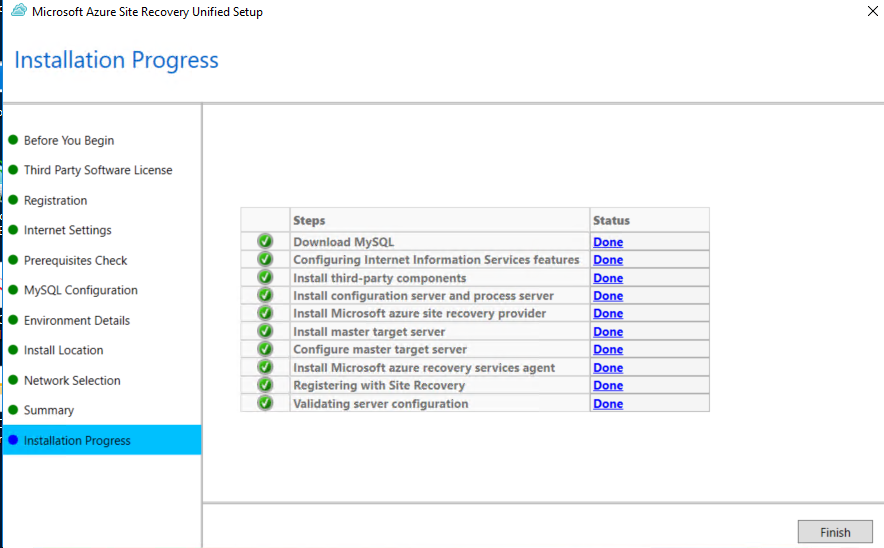
5. Once completed, click Finish
6. Launch the configuration utility to Add Account, and Register the replication server with Azure Migrate.

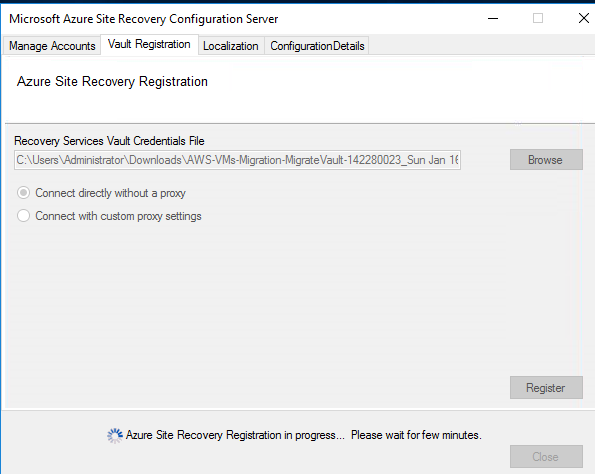
7. After successfully registering the server, go back to Azure Migrate: Server Migration, Discover and click on step 3: Finalize registration.


The replication server is now ready for data replication to Azure.
Before on-premises servers can replicate to the replication server and migrate to Azure, a mobility service needs to be installed and configured on the servers. You can find the Mobility service installation files on the replication server under “%ProgramData%\ASR\home\svsystems\pushinstallsvc\repository”. There are platform-specific files and versions.
For example, “Microsoft-ASR_UA_9.46.0.0_Windows_GA_02Nov2021_Release” is the Windows version.
Copy the file to the Windows server and run the commands below to extract the contents of the installer file to a local folder, run the Mobility Service Installer, and register the agent with the replication appliance:
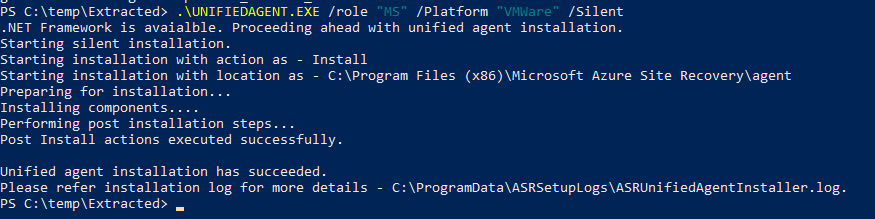

The server is now ready for replication.
To replicate the server data to Azure, follow the steps below:
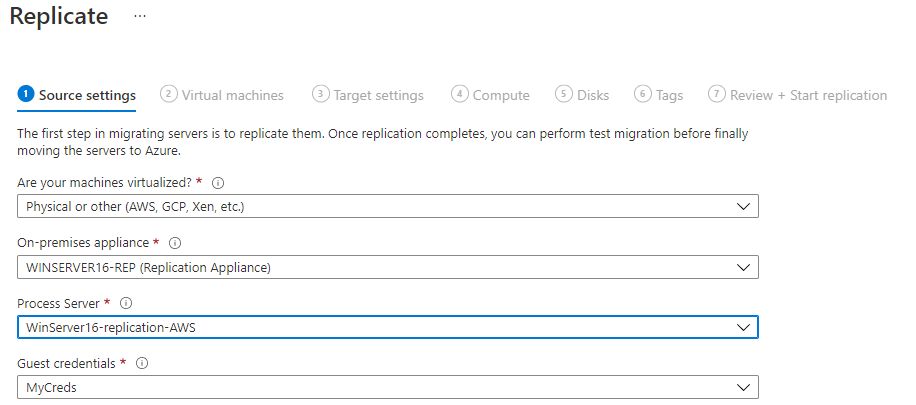
1. In the Migration tools section, click Replicate servers under Azure Migrate: Server Migration.
2. Select the source platform (VMware, Hyper-V, or Physical). This project is migrating a VM hosted in AWS, so the source is Physical or other (AWS, GCP, Xen, etc.).
3. Select the on-premises appliance and replication servers and the configured guest credentials.
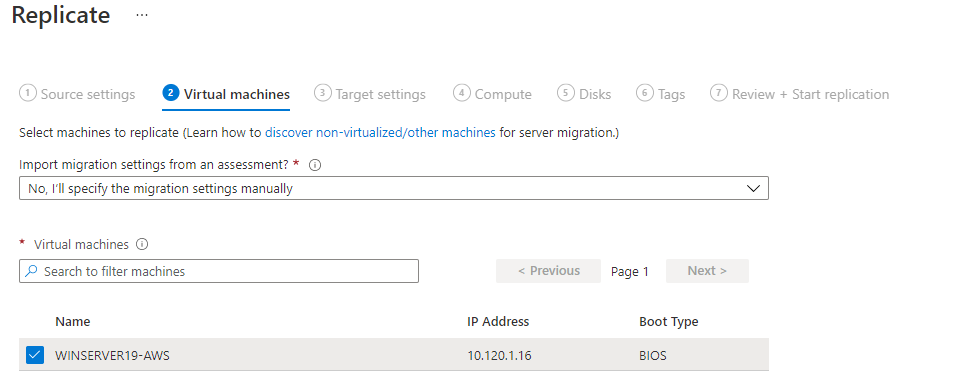
4. Specify the migration settings manually and select the VMs to be migrated.
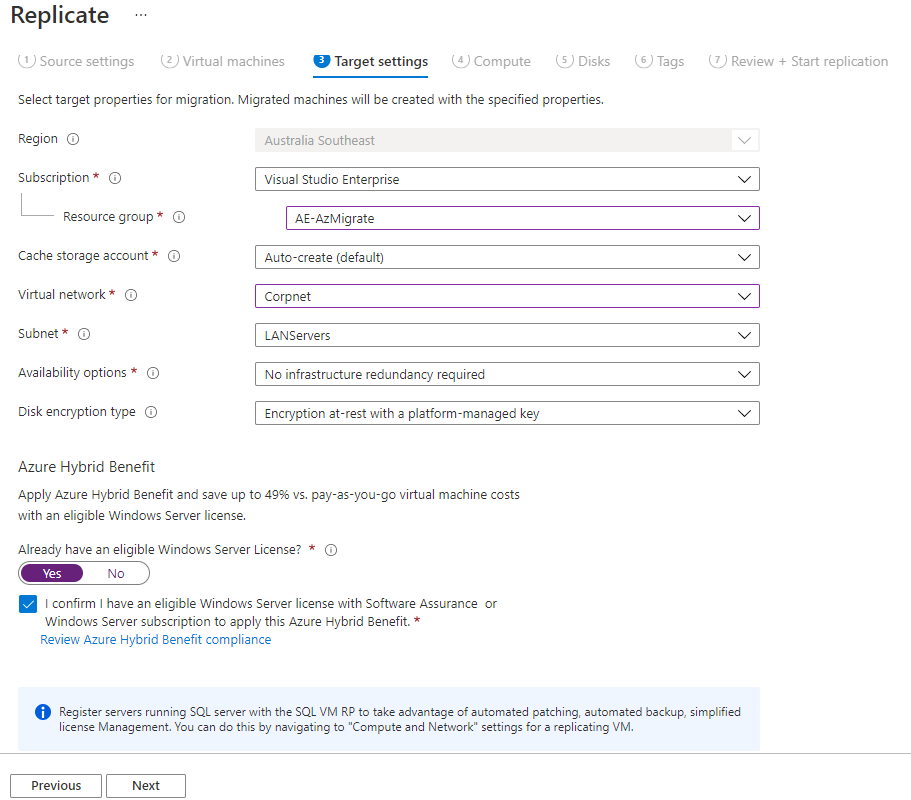
5. Target settings are the specified properties of the end state. Target settings include region, subscription, resource group, storage account, VNet and subnet, and availability options. Azure Hybrid Benefit is an optional feature that can save organizations up to 49% on Windows Server licensing costs.
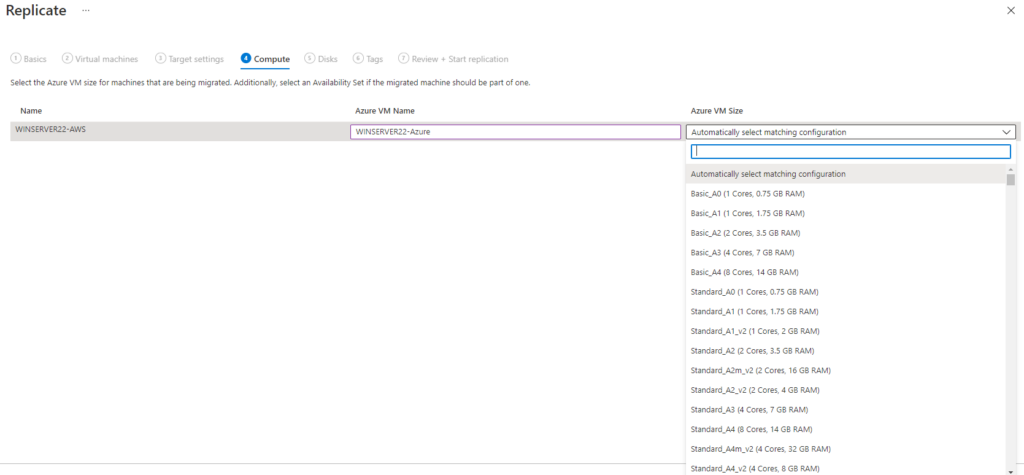
6. The Compute page allows for Azure VM name and size changes. The defaults are to keep the source VM name and automatically select matching configuration.
7. The Disks page allows for changes in replicated disks and types. The wizard picks all selected disks and matches disk type configuration.

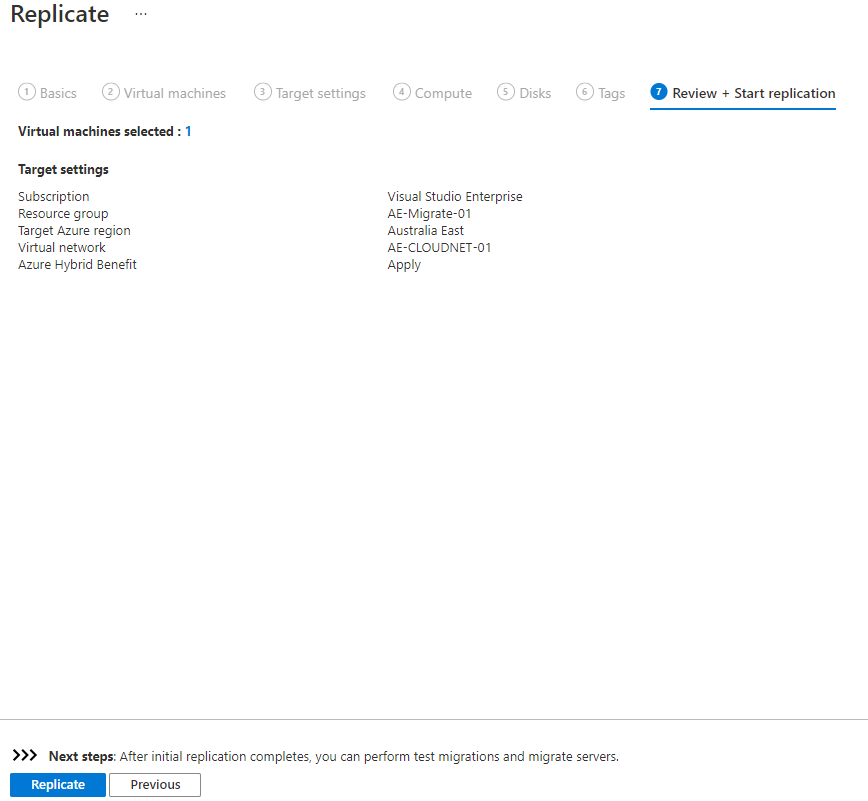
8. Validate that all selected options are correct on the Review + Start replication page and click Replicate to start the process.
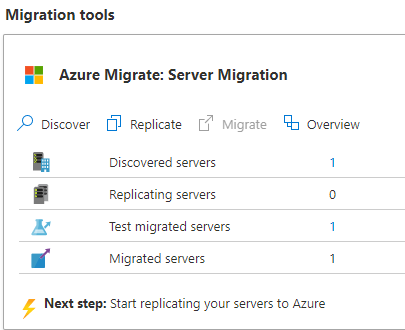
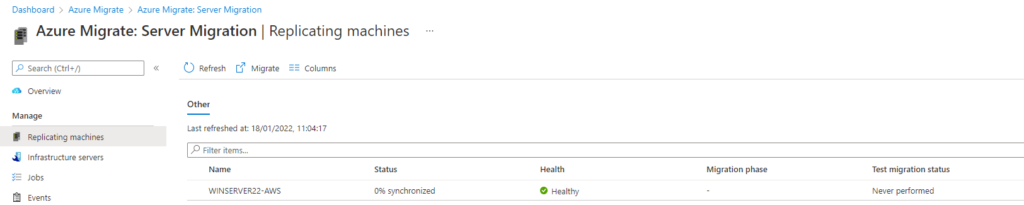
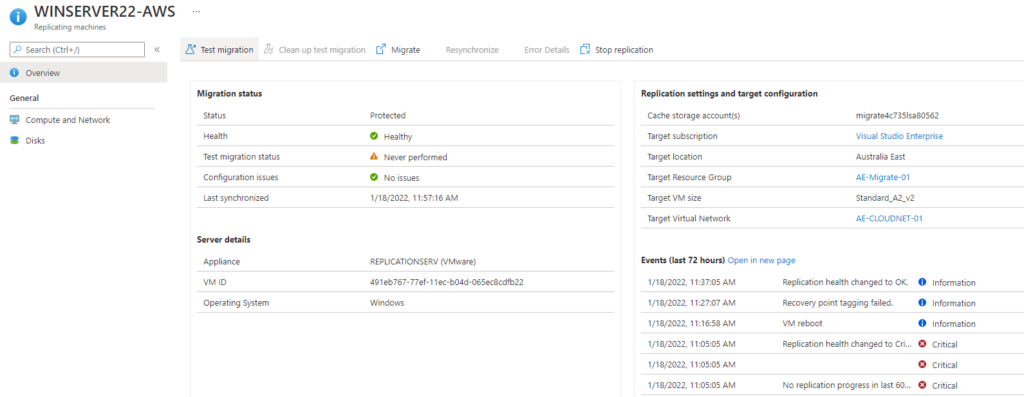
9. Check replication status under Replicating machines. Take note of the Status and Health indicators. Once server replication is completed, the status should be Protected and the health should be Healthy.

Test Migration
Now that replication is successful, and the servers are protected and healthy, we can start a test migration. The significance of running a test migration is that it validates that the migration will work as expected. Test migration does not impact the on-premises servers, as they remain operational and continue replicating to Azure.
To run a test migration, follow the steps below:
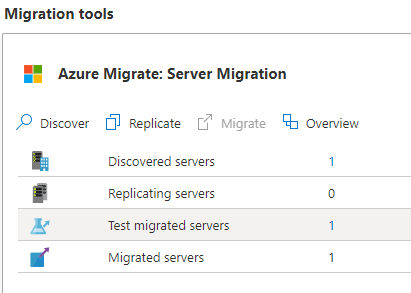
1. Click Test migrated servers under Azure Migrate: Server Migration in the Migration tools section.
2. Select/click the servers for test migration
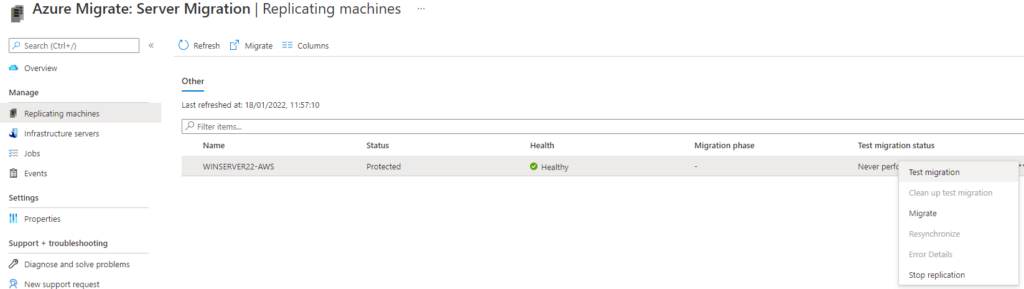
a. Click Test migration in the replication machines window.
Alternatively, click on the three dots (…) and select Test migration in the Azure Migrate: Server Migration | Replicating machines window.
3. Select the virtual network, and click Test migration
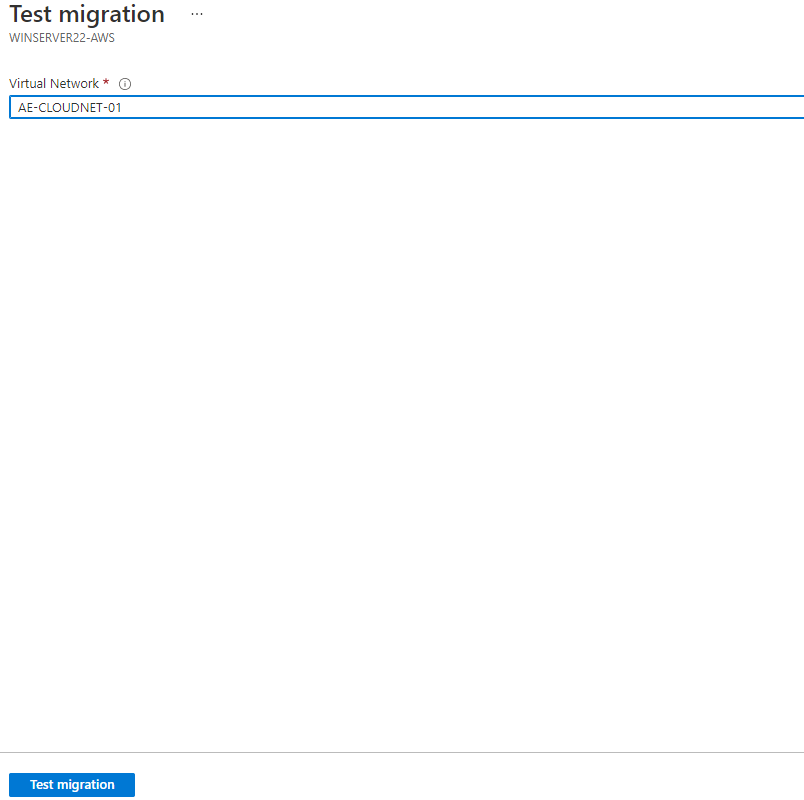
Test migration simulates the migration by creating an Azure VM using replicated data. This can be validated by accessing virtual machines in Azure and checking the migrated VM. Azure Migrate uses the source VM name and suffixes it with test.
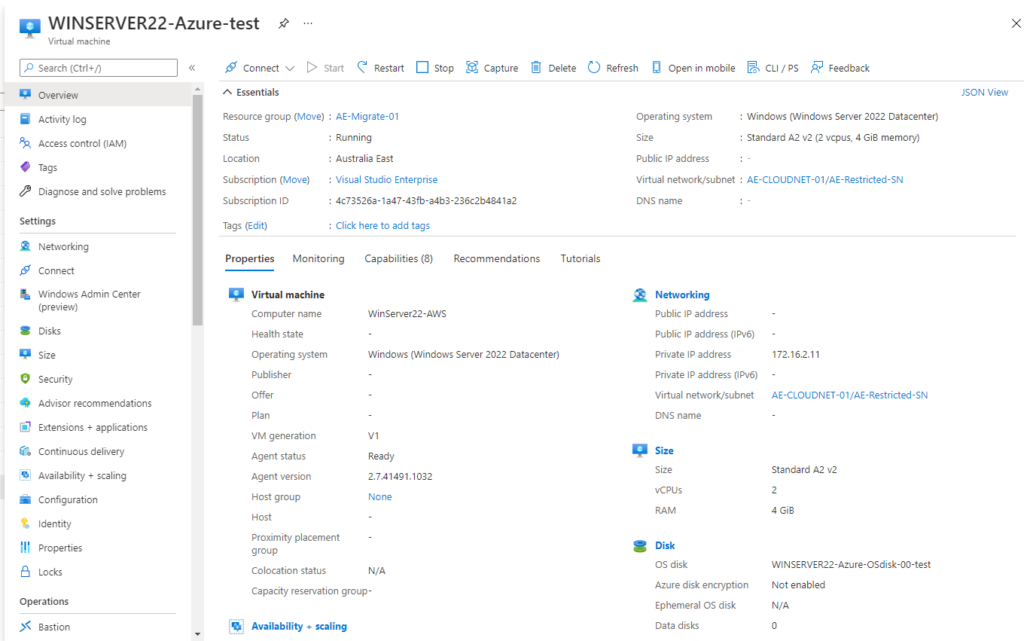
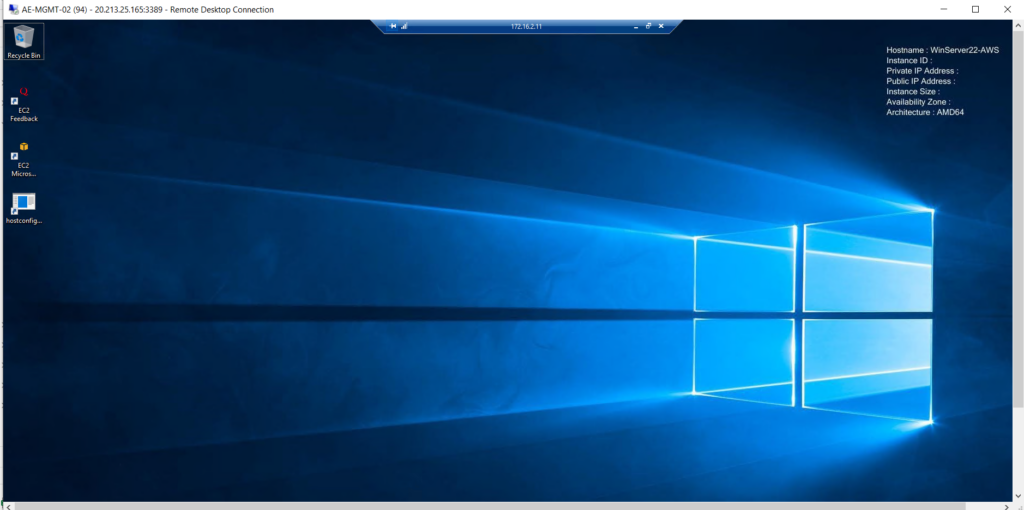
4. Use the test Azure VM to validate the migration, perform application testing, and address any issues before doing the full migration.
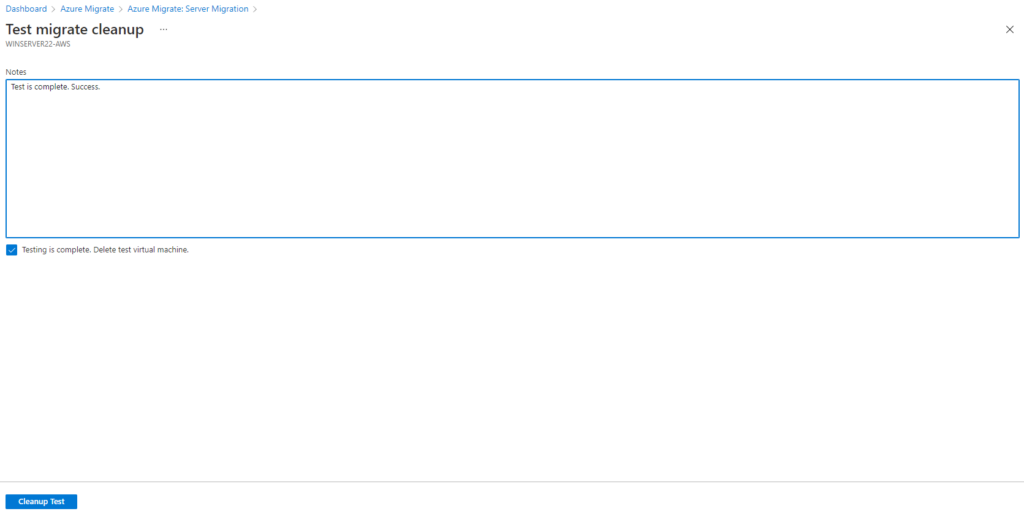
5. After the test is done, right-click the Azure VM in Replicating machines, and click Clean up test migration.
Production Migration
To run a production migration, follow the steps below:
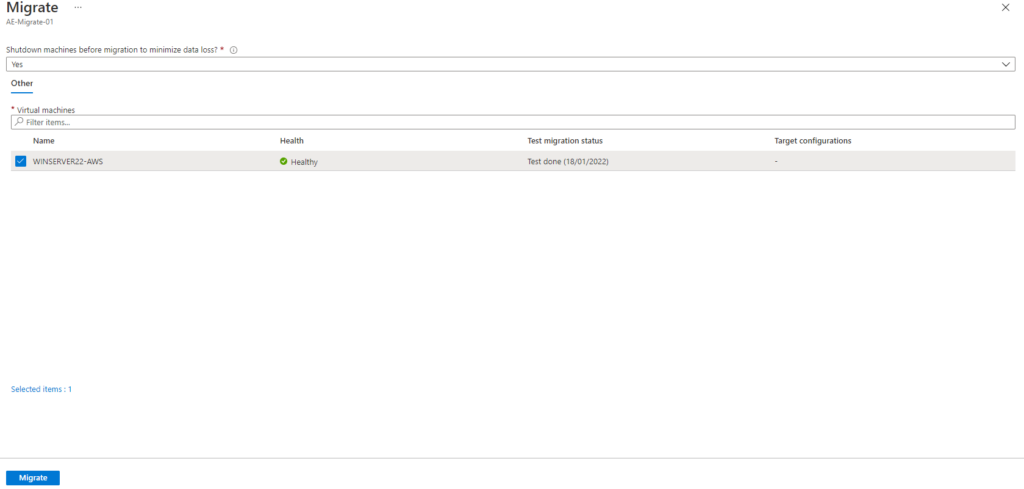
1. Click Migrated servers in the Azure Migrate: Server Migration section
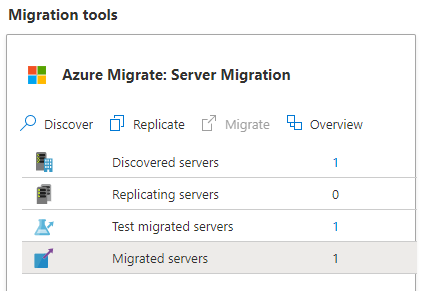
2. Select Yes to shut down the VM before migration
3. Click Migrate.
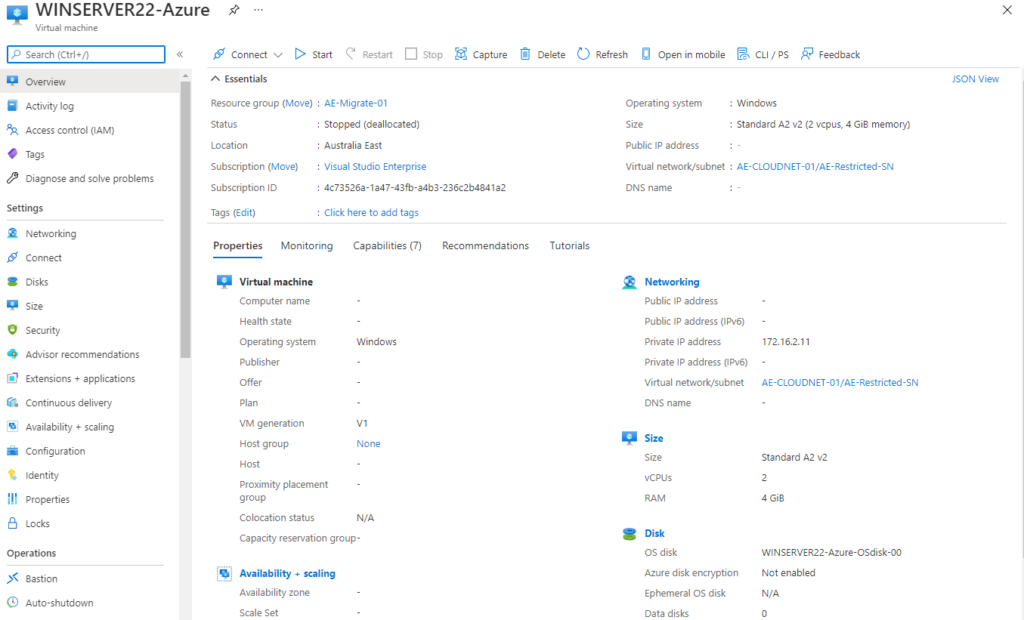
4. Use Azure Notifications, top right-hand side, to check the migration progress and look for errors. Check the activity logs for more information.


Conclusion
Azure Migration Services and the associated Azure Migrate platform provide a central hub of integrated Microsoft and partner tools to help organizations migrate workloads to Azure. The service offers discovery and assessment, sizing, replication, and migration tools.
Organizations can use Azure Migrate to move virtualized and physical Windows and Linux workloads to Azure. Supported workloads include servers, databases, web applications, and virtual desktops.
You like our article?
Follow our monthly hybrid cloud digest on LinkedIn to receive more free educational content like this.